One of the responsibilities of the Technical Coordinator in the Ohio Section is to submit something for the Section Journal. The Section Journal covers Amateur Radio related things happening in and around the ARRL Ohio Section. It is published by the Section Manager Scott – N8SY and articles are submitted by cabinet members.
Once my article is published in the Journal, I will also make it available on my site with a link to the published edition.
You can receive the Journal and other Ohio Section news by joining the mailing list Scott has setup. You do not need to be a member of the ARRL, Ohio Section, or even a ham to join the mailing list. Please sign up!
If you are an ARRL member and reside in the Ohio Section, update your mailing preferences to receive Ohio Section news in your inbox. Those residing outside the section will need to use the mailing list link above.
Updating your ARRL profile will deliver news from the section where you reside (if the leadership chooses to use this method).
Go to www.arrl.org and logon.
Click Edit your Profile.
You will be taken to the Edit Your Profile page. On the first tab Edit Info, verify your Email address is correct.
Click the Edit Email Subscriptions tab.
Check the News and information from your Division Director and Section Manager box.
Click Save.
Now without further ado…
Read the full edition at: http://arrl-ohio.org/news/2018/OSJ-Jan-18.pdf
THE TECHNICAL COORDINATOR
Jeff Kopcak – TC
k8jtk@arrl.net
 Hey gang,
So nothing really tech news related happened this month. Eh, not so much. The New Year brought two major flaws in nearly every modern microprocessor: Meltdown and Spectre.
In the past, major security issues were able to be corrected through software or firmware updates. This is because almost everything is now run by small amounts of software and can be easily updated. Design issues are harder to fix because the problem is fundamental to the design of a device.
Description from Meltdownattack.com:
Meltdown and Spectre exploit critical vulnerabilities in modern processors. These hardware vulnerabilities allow programs to steal data which is currently processed on the computer. While programs are typically not permitted to read data from other programs, a malicious program can exploit Meltdown and Spectre to get hold of secrets stored in the memory of other running programs. This might include your passwords stored in a password manager or browser, your personal photos, emails, instant messages and even business-critical documents.
Meltdown and Spectre work on personal computers, mobile devices, and in the cloud. Depending on the cloud provider’s infrastructure, it might be possible to steal data from other customers.
Meltdown affects nearly all Intel microprocessors manufactured since 1995. In modern computing, an operating system “kernel” handles all interactions between applications (web browser, word processing, spreadsheets) and hardware (CPU, memory, network, USB devices). By its nature, the kernel must know everything about system interactions.
 CPUs have different operating modes. Two modes apply to Meltdown: unprotected (called kernel mode) and user mode. Kernel mode has access to everything while instructions executed in user mode should not have access to the same memory as the kernel.
Meltdown is the demonstration of an unauthorized user mode process accessing kernel mode memory. This means a user process can access information to which it doesn’t have permission. Think of systems that share data among many users like an online cloud service. Isolation techniques are one of the major selling points of the cloud. Multiple users can be using the same physical hardware and not impact or know anything about other users also using the same hardware. A malicious process could use meltdown to access the data of other people’s applications running on the same device.
Spectre affects nearly all microprocessor implementations of speculations and predictions. In an effort to make systems run faster, a huge amount of speculative processing is engineered into processors. Speculation is the processors answer to the question: what is most likely to happen with this instruction set? Being able to “guess” the right answer provides a massive performance boost and we all want fast systems. To explain one part of this vulnerability, consider two math equations are given to a microprocessor:
a + b = c
d + e = f
 The processor will recognize calculation of the second equation does not depend on anything from the first equation. This means the processor will execute these equations simultaneously until it reaches a common dependency. That dependency would be something like:
a + b = c
(d + e) * c = g
The answer c is used as an input into the computation of the second equation. Running this set through the processor would be slower because they couldn’t be calculated simultaneously. An input into the second equation is dependent on the answer to the first.
Using the same equations, let’s assume for everyone in the Ohio section, the answer to c = 5. A programmer could write an instruction set following that calculation to say: if c = 5 then take fork #1, otherwise take fork #2. How do humans know which fork to take? Calculate the value of c. However, processors try to use “speculative execution” to perform the work of both forks before it knows the answer to c.
Let’s add super-secret data to fork #1: “the Ohio Section IS the best section.” We don’t want fork #2 to know anything about that data because it might be someone from another section trying to break-in. A processor would execute both fork instruction sets speculating on the outcome. This speculation could allow someone from another section to see our secret in fork #1 when they should only see something else in fork #2. Consider a malicious smartphone application taking advantage of this to access text messages, instant messages, mobile baking data, or critical documents.
The lengthy process of dealing with these issues has begun. The only way to truly “fix” these problems is to design new CPUs architectures and replace existing ones. Yeah, sure. Remember, these issues are fundamental to processor design. If these flaws are ever corrected, it will be over a period of time – not tomorrow, next week, or even next year. In the meantime, operating systems are implementing methods to prevent attacks.
In the rush to get these fixes out, as one might expect, more problems are being caused. Microsoft has reported issues with anti-virus applications not playing nice and claiming AMD’s documentation was incomplete. Ubuntu 16.04 users had issues forcing them to roll back the kernel. In addition to all this, processor performance is impacted. Testing done on operating system patches shows slowdowns of 2% – 30%.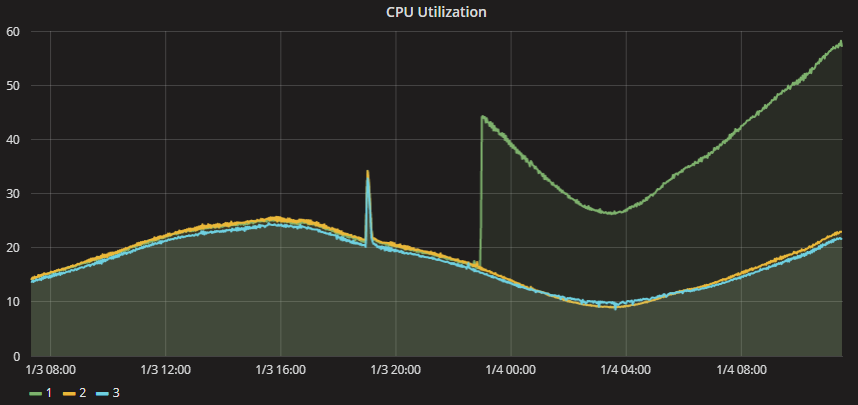 A forum post on Epic Games included the above graph showing CPU usage of 3 cloud servers. After their cloud provider patched one server at about 23:00, CPU utilization of that server increased nearly 2.5x over the other two. Though the CPU wasn’t maxed out, it was enough to cause service disruption. Gamers really don’t like it when their services don’t work.
For most users, stay current with system patches and updates. In particular, Microsoft is requiring anti-virus programs to set a registry key before Windows will apply system updates. As of this writing, if you do not run, have an out-of-date, or have a non-compliant anti-virus application, your system will NOT receive any future Windows updates including the patches for Meltdown and Spectre. Current versions of Windows can run the free Windows Security Essentials available for Windows 7 or Windows Defender is included in Windows 8, 8,1, and 10.
Bruce Schneier, a well-known cryptographer and security researcher states: “… more are coming, and they’ll be worse. 2018 will be the year of microprocessor vulnerabilities, and it’s going to be a wild ride.” Link to his blog post.
More information:
https://meltdownattack.com/ – research papers, technical information, FAQ, videos in action, and info from companies affected.
https://en.wikipedia.org/wiki/Meltdown_(security_vulnerability)
https://en.wikipedia.org/wiki/Spectre_(security_vulnerability)
Thanks for reading and 73… de Jeff – K8JTK